
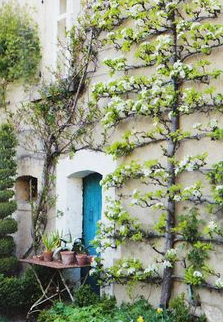
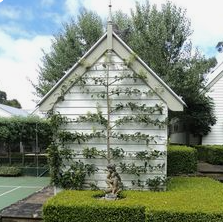
Espalier art of training a tree is an ancient practice. If you only have a small space to garden & grow your vision into reality; here it is. What does Espalier mean anyway? It is the ancient technique of training woody plant growth to produce fruit by pruning and tying branches to a frame. It derives from the Italian word spalliera, which means something to rest the shoulder (spalla) against. Originally, it referred to the structure on which gardeners trained plants to grow in the confined spaces of small courtyards. Today, the word is used to refer to the practice as well as the plants themselves.
=================
|| ESPALIER ||
Art of Training a Tree – Step-by-Step Process
=================
Choose a Site & Design
The first things you’ll have to do are to choose a site and create a design. The site can be against just about any vertical structure. Typically, that will be the wall of your home or garage, a trellis or a fence. However, you can even espalier free-standing plants!
Once you’ve chosen a site, you’ll have to decide on the design. Your design can be informal or formal, depending on your lifestyle and the type of garden you enjoy. The only limits are space and creativity. You can even create a design in the shape of a heart, if you want.
Once you have a design in mind, it may help at this point to mark on the wall, wood frame, brick or stone. This is where you will want to put the supports that will connect the wires along where your plant will grow.
It’s also a good idea at this point to perform a soil test on your site. The test will let you know if your soil has any serious deficiencies that should be amended. This is especially important if a deficiency might adversely affect the type of plant you want to grow.
What Plants to Use
While you can espalier almost any plant, be sure to choose one that meets the light requirements of your growing site and the temperature requirements of your growing zone.
Just a few of the choices among ornamentals include camellia, gardenia, quince, viburnum, red bud, magnolia, wisteria and witch hazel. If you like fruit trees, decide whether you want an edible or an ornamental variety. Popular options for edibles include apples, pears, peaches, plums and pomegranates. If foliage plants appeal to you, cedars, Japanese maples, and hollies are just a few you might want to plant. For something really unusual, consider ginkgo, olive, or even moringa trees, as I plan to test these. Although, they most likely won’t bare fruit because of the region’s notoriously high humidity. We’ll see.
How to Make a Wired Espalier
After deciding on a plant and a site, you’ll need to find a support system. That system can be one you create or it can be a preconstructed trellis or frame that you’ve purchased.
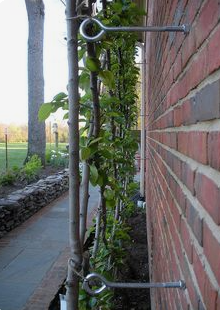
Even though you can build and maintain support systems mounted directly against a wall, it is best for people to create a support structure from scratch & keep it at least six inches from a wall to promote good light and air circulation and help prevent pest and disease problems. This is especially important for northern gardeners who want to espalier a plant on a brick or stone wall. Masonry and stone walls absorb heat from the sun, and when they reflect or release that heat, it can crack the bark of plants growing too close to the wall.
For those who are handy at do-it-yourself projects, here’s a five-step process for creating a wire espalier against a masonry structure. Before getting started, assemble all the tools you will need to complete this stage of the job. These include:
- Drill with a masonry bit. (Depending on the toughness of the surface you’re working with, you may need a hammer drill.)
- Masonry anchors. (A salesperson at the hardware store can help you select the right anchor to support the plant you want to espalier.)
- Hammer
- Eye hooks sized to fit the anchors
- Screwdriver
- 14-gauge or thicker galvanized wire
- Turnbuckles
Creating the wire form
- Drill holes in the wall for the screw holes. Use a masonry bit sized for the masonry anchors you’ve chosen. You’ll have to decide whether it’s easier to drill into the brick or the mortar. Don’t rush this step. Working too fast may cause the drill and the bit to overheat. Be sure drill holes that are at least 1/4-inch deeper than the anchor.
- Place anchors in the holes. Remove as much of the brick or concrete dust from the holes as you can, and then use a hammer to tap the anchors into the hole. The anchor should be recessed just behind the surface of the brick or mortar and fit snugly into the hole. If it goes easily into the hole or is loose, place a sliver of wood beside the anchor to wedge it into place.
- Screw the eye hooks into the anchors. Screw each eye hook into the anchor by hand, and go as far as you can. Then insert a screwdriver into the eye hook to gain more leverage to finish screwing the eye hook into the anchor. The eye hooks will cause the anchors to expand in the hole and create a tight connection. Put all the eye hooks in the wall before proceeding to the next step.
- Tie wire to the screw eyes. Insert the end of the wire into the screw eyes on the eye hook, loop it through the screw eye twice and then tighten the wire to the eye hook by wrapping the wire around the wire leading into the eye hook three times, which will create a noose-like appearance. Now tie the long end of the wire to the next eye hook, running the wire from eye hook to eye hook, pulling each segment as tight as possible.
- Turn the turnbuckle. Every so often in the turns of the pattern you’ll need to use a turnbuckle. Stretch the wire from the end of one run to meet the next wire. Where they meet, use a turnbuckle to make a tight fit. Use a screwdriver, as you did with the screw eyes on the eye hooks, to gain leverage. You may need to retighten the turnbuckles from time to time as the wire may stretch slightly.
Planting the tree
Choose a young plant that is very, very small and plant it as close as you can to the support structure. It’s best to start with young plants in small containers, he says, because it will be difficult to find a larger plant that is growing in a branching pattern that will fit your design.
If you’re growing a fruit tree such as an apple tree, a whip is not too small. Whips are just that, very young trees that are a stem without branches that have been grafted onto a root stock. Maidens, which are slightly older than whips, will also work fine. These are usually available only in the wholesale trade and therefore may be difficult for home gardeners to find. The point, he says, is to remember to start with small plants so you can shape branches when they develop into the contours of your design.
Maintaining the tree
With your tree or shrub now in the ground, resist the urge to fertilize. In fact, never fertilize a plant that you want to espalier. Most espalier projects, especially for home gardens, are in small spaces, and fertilizing will cause the plant to grow too big with branches and stems that tend to be weak and spindly. Simply water it in to settle the soil around there roots and to reduce transplant shock.
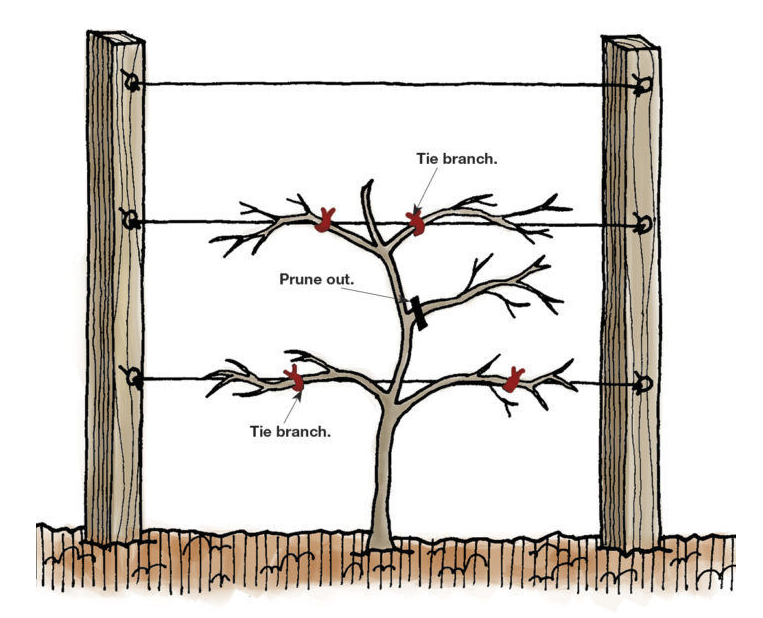
Next, you’ll have to shape your plant to your design by training buds and branches to send out new growth along your support wires or trellis supports. How to prune properly is the most confusing thing most gardeners encounter in an espalier project.
The idea is to remove buds that are not facing in the direction of your supports and to permit the buds facing in desired directions to develop into shoots. If you’re creating a tiered or horizontal T-shape, you will want to keep a central leader. If you are creating a fan shape, you will want to prune off the leader to force out two main side branches that will form the base of the fan.
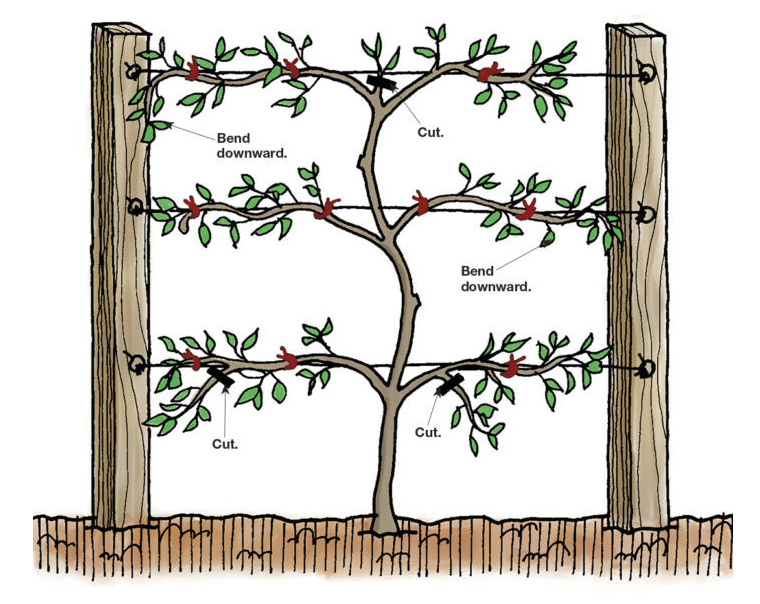
Essentially, deciduous pants will need to be pruned at least twice a year and evergreens will need to be pruned once a year or as needed. For deciduous plants, during the growing season you’ll need to cut off new side shoots from your main branches so the remaining shoots (also called arms) are five to six inches apart. Then when the arms become rigid and pencil thick, cut them back to three leaves. Prune previously pruned arms to one leaf.
In the winter when the plants are dormant, thin out the spurs that grow from the arms as needed. Remove any new vertical shoots that have emerged between the arms and remove any non-cowering shoots from the spurs. Also, tip prune branch ends as needed.
How long will it take?
Plan on a minimum of four years for your plant to become established and take on the desired appearance you envisioned at the start.
After five or six years, if your plant has become really happy and puts out too much foliage growth, root pruning may be in order. Simply dig a trench a few feet from the trunk and cut off the big fleshy roots. This keeps a balance between what is happening above and below ground.
If you’re beginning to think this sounds a little like bonsai just on a larger scale, you’re right. The idea is to shape limited, tight and compact growth into a desired form.
There’s one thing you’ll need to do to ensure success in your espalier project. And, it may be the most difficult thing to do; summoning up a bit of patience. Like planting any tree or shrub, a plant chosen for espalier won’t reach maturity overnight.
You’ll need to wait at least four years for your plant to reach maturity. That may seem a long time to look at bare wires or other support material for the branches to fill out the design you’ve created. But if you can stand the wait, the rewards of harvesting fruit or admiring blooms beautifully presented in an unusual way and in a space where a tree or shrub could never grow will be worth it.
=================
You may want to visit our SPORTS & OUTDOORS category for similar information.
=================